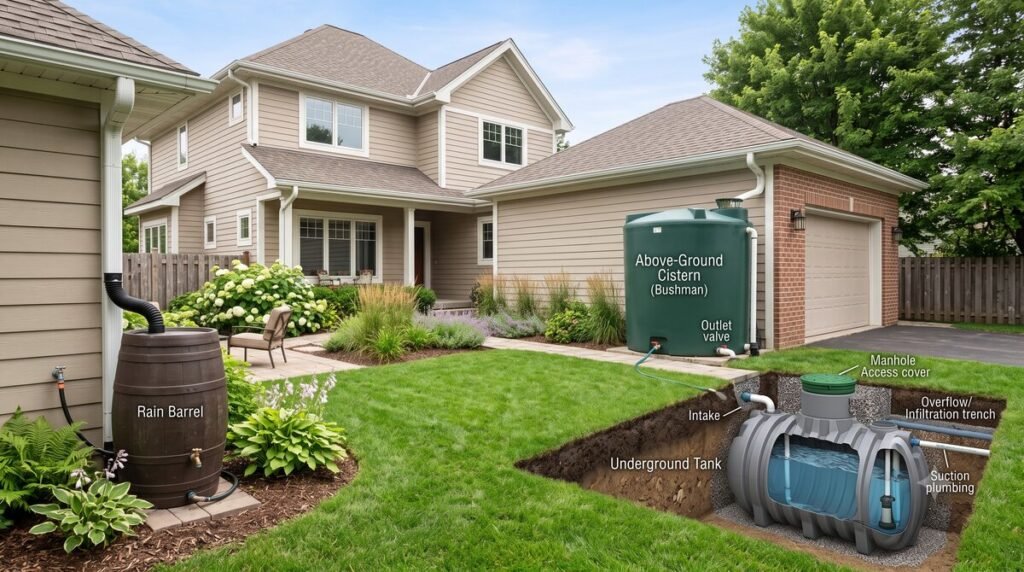
Once you’ve confirmed rainwater harvesting is legal where you live, the next question is almost always about scale: do you need a $70 barrel by the downspout, or a several-thousand-dollar underground tank? The honest answer is that “rainwater harvesting system” covers a huge range of hardware, and the right size depends entirely on what you’re trying to do with the water — a few gallons for container plants versus enough storage to meaningfully offset a household’s outdoor water use.
This isn’t a buying guide with specific product picks — it’s the explainer that makes the capacity and cost numbers you’ll see elsewhere actually make sense. (If you’re ready to shop, we cover specific models separately in our guides to the best rain barrels and best underground water tanks.)
Rain barrel vs. cistern vs. underground tank, at a glance:
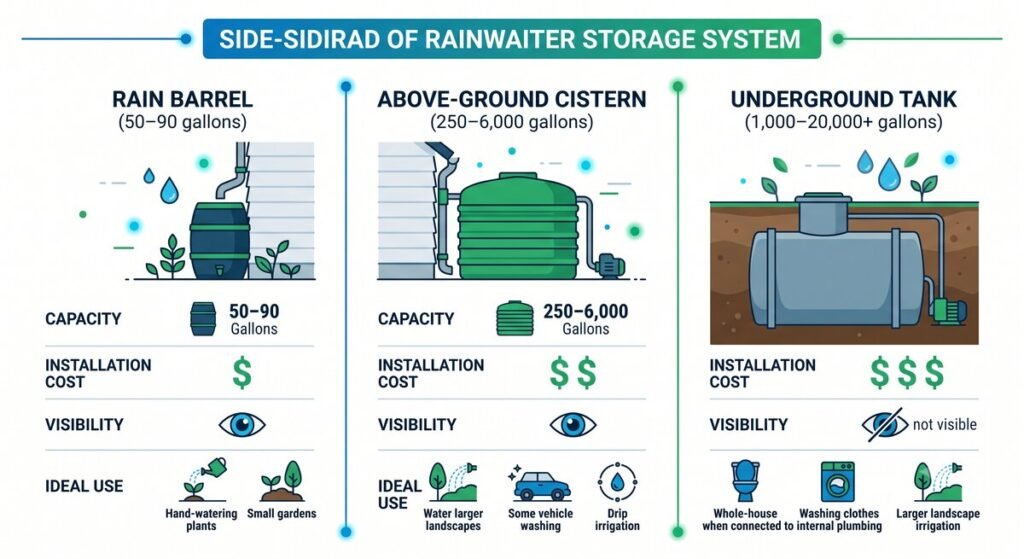
- Rain barrel: 50–90 gallons, for container gardens and a few raised beds.
- Above-ground cistern: 250–6,000 gallons, for lawns and larger landscape irrigation.
- Underground tank: 1,000–20,000+ gallons, for high-volume irrigation or whole-property water storage.
The three tiers, in plain terms
1. Rain barrels
The entry point into rainwater harvesting. A standard rain barrel holds around 50–90 gallons, sits above ground against the house, and connects to a single downspout through a diverter.
How it works day to day: rainwater runs off the roof, through the gutter, and into the barrel through a diverter fitted into the downspout. A spigot near the bottom lets you fill a watering can or connect a hose; an overflow outlet redirects excess once the barrel fills.
Cost: roughly $50–$300 for a basic DIY setup — barrel, diverter, overflow hose, and a raised platform or cinder blocks to get gravity-fed pressure at the spigot. Professional installation runs somewhat higher, mainly for the platform work.
Best suited for: container gardens, a few raised beds, or topping off watering cans — genuinely useful for small-scale garden irrigation, but with little effect on overall stormwater runoff unless you’re draining and reusing the barrel between storms. If you’re setting one up for the first time, our step-by-step guide to installing a rain barrel walks through the diverter and platform setup in more detail.
2. Above-ground cisterns
The middle tier — larger tanks, typically 250 to a few thousand gallons, usually cylindrical, sitting on a pad next to the house or along a property line.
How it works day to day: functions like a scaled-up rain barrel — gutters feed into the tank, and it can supply a garden hose by gravity or step up to a small pump for stronger pressure or drip-irrigation delivery. Some setups link multiple tanks together to multiply total capacity without changing footprint too much per unit.
Cost: roughly $300–$1,500 for a small tank (250–1,000 gallons) up to $1,000–$5,000 installed for a standard above-ground system. This is generally classified as a “dry” system, since water only flows through the collection pipe during rainfall, leaving it dry between events — which keeps installation relatively simple compared to underground systems.
Best suited for: homeowners who want to meaningfully offset garden or lawn irrigation, not just top off a few containers, without taking on excavation work.
3. Underground cisterns / tanks
The largest and most involved tier — buried tanks that can range from 1,000 gallons up into the tens of thousands for larger properties, completely out of sight once installed.
How it works day to day: water is piped underground from the gutters into a buried tank, then pumped back out via a submersible pump for irrigation or, with additional filtration, indoor non-potable uses like toilet flushing. This is generally classified as a “wet” system, because water sits in underground piping between rain events rather than only flowing during rainfall.
Cost: the widest range of the three — roughly $3,000–$8,000+ once installed, and $17,000 or more for the largest residential tanks. The premium over an above-ground system comes from excavation ($1,000–$3,000), a submersible pump ($300–$800), and first-flush diverter and filtration components ($200–$500), on top of the tank itself.
Best suited for: properties where visual impact matters (no tank taking up yard space), larger irrigation demands, or homeowners aiming to offset a meaningful share of whole-property water use.
What are these tanks actually made of?
Material varies by tier and budget. Rain barrels are commonly made from recycled food-grade plastic, which keeps them lightweight and inexpensive. Larger cisterns step up to polyethylene, fiberglass, concrete, or steel, chosen based on budget, footprint, and whether the tank sits above or below ground. Underground installations most often favor polyethylene or concrete specifically, since both hold up well under soil pressure and moisture exposure — the right choice between the two usually comes down to local soil conditions and what your installer is set up to work with. Whichever material you land on, our rainwater harvesting maintenance checklist covers the upkeep specific to each.
Quick comparison
| Rain Barrel | Above-Ground Cistern | Underground Tank | |
|---|---|---|---|
| Typical capacity | 50–90 gallons | 250–6,000 gallons | 1,000–20,000+ gallons |
| Typical installed cost | $50–$300 | $300–$5,000 | $3,000–$17,000+ |
| Installation | DIY, 1–2 hours | DIY to semi-professional | Professional, excavation required |
| Visual footprint | Small, visible | Larger, visible | None once buried |
| Pressurized distribution | No — gravity/spigot only | Optional, with a small pump | Yes, typically pump-fed |
| Best suited for | Container gardens, a few beds | Garden/lawn irrigation offset | Whole-property or high-volume use |
How much rainwater can your roof collect?
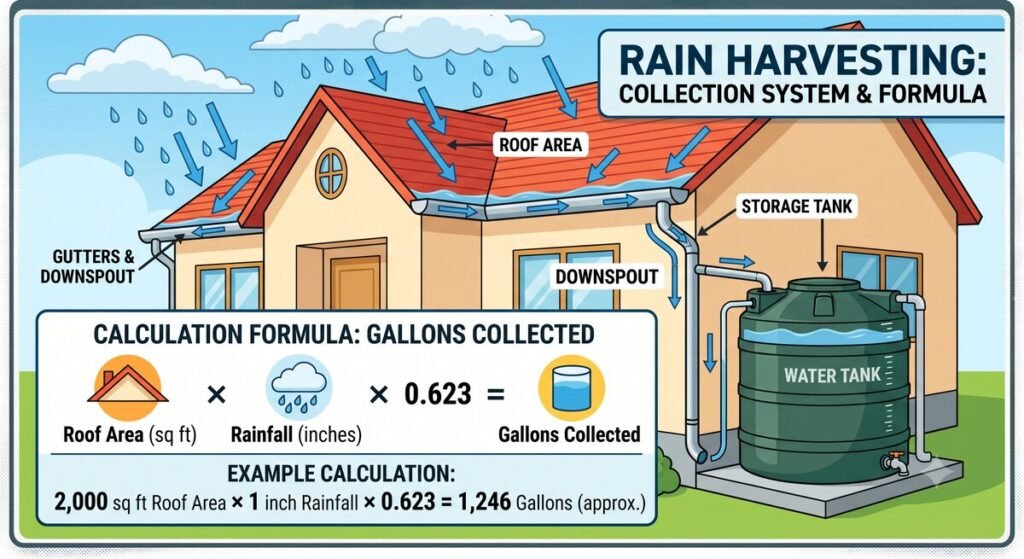
Before sizing a system, it helps to know what your roof can actually supply. The standard formula is:
Roof area (sq ft) × Rainfall (inches) × 0.623 = gallons collected
That 0.623 figure converts one inch of rain falling over one square foot into gallons. So a 2,000-square-foot roof receiving 1 inch of rain can collect about 1,246 gallons before accounting for losses — and losses are real: expect to lose roughly 10–25% to evaporation, first-flush diversion, gutter overflow, and roof-surface absorption, so treat the raw formula as a ceiling rather than what actually lands in the tank.
This number is the foundation of any rainwater harvesting system sizing decision, since it tells you the realistic ceiling on how much water is even available to store, no matter how large a tank you buy.
How Big a Cistern Do I Need?
This is the number most people guess wrong in either direction. A reasonable rule of thumb for rainwater harvesting system sizing is to match storage capacity to roughly 2–4 weeks of your typical outdoor water use, so the tank has enough of a buffer between rain events without being wildly oversized for your actual needs. As a rough guide to cistern gallons per household:
- Container or small raised-bed garden: a single 50–90 gallon barrel is often genuinely sufficient.
- Larger garden or partial lawn irrigation: 1,000–5,000 gallons of cistern capacity is the common range homeowners land on.
- Whole-property or off-grid ambitions: 10,000+ gallons, typically paired with a backup municipal connection rather than relying on rainwater alone.
Your region’s typical rainfall changes this math meaningfully — the roof-runoff formula above tells you supply, but how that supply is spread across the year determines how much storage you need to bridge the dry stretches:
| Region | Typical annual rainfall | Sizing implication |
|---|---|---|
| Desert Southwest | ~10–15 inches | Lower total supply per roof square foot — storage mainly bridges long dry seasons rather than daily gaps |
| Midwest | ~30–45 inches | Moderate, fairly steady supply — mid-range cistern capacity usually keeps pace with garden and lawn use |
| Pacific Northwest | 40 to 80+ inches (much higher near the coast) | High supply concentrated in wet winters — larger storage lets you carry water into the drier summer months |
| Southeast | ~50–60 inches | High but often stormy/uneven — storage smooths out the gaps between heavy rain events rather than a true supply shortage |
Factor in your specific local rainfall pattern, not just the regional average, since rain shadow, elevation, and distance from the coast can vary rainfall considerably even within one state.
What about maintenance?
Upkeep scales with system size and complexity:
| System | Maintenance |
|---|---|
| Rain barrel | Clean twice a year; check the diverter and screen for debris after storms |
| Above-ground cistern | Inspect filters and overflow points seasonally; check for algae growth if the tank isn’t fully opaque |
| Underground tank | Annual pump and filter inspection; check first-flush diverter function before the rainy season |
For a more complete walkthrough by system type, see our rainwater harvesting maintenance checklist.
One distinction worth understanding regardless of size: potable vs. non-potable
All three tiers described above are designed for non-potable use — irrigation, car washing, and similar outdoor tasks — not drinking water. Turning any rainwater system into a drinking-water source requires dedicated treatment components that a standard outdoor system doesn’t include, and many municipalities require a licensed plumber for that step specifically. Indoor non-potable use, like toilet flushing, sits in between: it requires plumbing separation from your regular water line but not the full potable-grade treatment a drinking system needs. If whole-home water displacement is the goal rather than just outdoor irrigation, confirm your intended end use before sizing or purchasing a system, since it can significantly change both the cost and the permitting involved.
So which one is right for you?
- Choose a rain barrel if your goal is topping off container plants or a few raised beds, and you want a same-afternoon DIY project.
- Choose an above-ground cistern if you’re trying to meaningfully reduce garden or lawn watering costs and don’t mind a visible tank on the property.
- Choose an underground tank if visual footprint matters, your property is large enough to justify the excavation cost, or you’re aiming to offset a substantial share of outdoor (or filtered indoor non-potable) water use.
Since rules do vary by location, it’s worth confirming your specific state and local requirements before buying — we cover that separately in our guide on whether rainwater harvesting is legal in your state.
Frequently asked questions
Do I need a permit for any of these? Rain barrels typically don’t require a permit. Above-ground and especially underground cisterns more often do, particularly if plumbing is involved — check with your local water authority before installing anything beyond a basic barrel.
Can I start small and upgrade later? Yes — this is a common approach. Modular tanks and linked multi-barrel setups let you add capacity later without replacing what you already have, which is a reasonable way to avoid overbuying before you know your actual usage pattern.
Do cisterns need mosquito protection? Yes, for any system with an opening — barrels and exposed cisterns should be sealed with mosquito netting or screening, and any inlet or overflow point should be secured so standing water doesn’t become a breeding site.
Is a “first flush” diverter necessary? It’s a recommended add-on rather than strictly required. It redirects the initial flow of runoff — which tends to carry more leaves, dust, and roof debris — away from the tank, keeping stored water cleaner and reducing filter and pump maintenance over time.
Topics: Buying Guides Landscaping Rainwater Harvesting Sustainable Landscaping
The GoEfte editorial team researches and compares yard, garden, and water products, drawing on manufacturer specs, horticultural extension guidance, and verified owner reviews to help homeowners choose the right gear for their space and budget.


